
If you want to install Typebot on a VPS without spending your afternoon wrestling with Docker commands, this guide is for you. I am going to use a Hostinger VPS, EasyPanel, email authentication, and the free service addresses that EasyPanel creates during deployment. By the end, you will have the Typebot builder, the public viewer, and MinIO storage working together.
I put this walkthrough together because self-hosting often looks much scarier than it really is. The process still requires attention, especially when credentials and environment variables are involved, but EasyPanel turns most of the infrastructure work into a visual setup. I will explain every important choice, show the order that worked for me, and point out the places where a tiny typo can cause a surprisingly big headache.
One honest warning before I begin: self-hosting gives me control, but it also gives me responsibility. I am responsible for server security, backups, updates, uptime, email delivery, storage, and troubleshooting. If that sounds like a fair trade for more flexibility and predictable infrastructure costs, let us get started.

What “Unlimited” Means When You Install Typebot on a VPS
The word “unlimited” needs context. In Typebot’s self-hosted configuration, the address entered as ADMIN_EMAIL receives an UNLIMITED workspace plan when that user is created. That administrator is not restricted by the normal Typebot Cloud plan limits inside the self-hosted installation.
That does not make the VPS itself unlimited. Real capacity still depends on CPU, memory, disk space, database performance, bandwidth, the complexity of each bot, and any third-party services connected to it. In other words, the workspace plan is unlimited, but the machine is still a machine. I monitor resources and upgrade only when actual usage gives me a reason.
There is also a licensing detail worth understanding. Typebot is fair source under the Functional Source License. Its official self-hosting overview says that a company can publish bots in client-facing products, a freelancer can create bots for clients, and creators can sell educational content about Typebot. It also says that I cannot commercialize access to my instance or offer a competing Typebot hosting service. I always check the current license before building a business model around self-hosted software.
Everything I Prepare Before Opening EasyPanel
I like to gather the essentials first. It prevents the classic situation where the server is ready but one missing login or mailbox password turns a quick installation into an evening project.
- A VPS with enough resources for Typebot, PostgreSQL, and MinIO
- EasyPanel installed on that VPS
- An administrator email address that I can access immediately
- The SMTP username and password for that mailbox
- A password manager or another secure place for recovery details
This method uses the free public addresses generated by EasyPanel, so I do not need to buy or configure custom subdomains. The builder address opens the private interface where I create bots. The viewer address serves published bots to visitors. I can connect custom domains later, but they are not required for this walkthrough.
Step 1: Choose a VPS With Enough Breathing Room
The first thing I need is a virtual private server. Shared hosting is designed mainly for websites, while this installation runs several persistent services. Typebot has separate builder and viewer applications, a PostgreSQL database, and MinIO for uploaded media. A VPS gives me the control and resources those containers need.
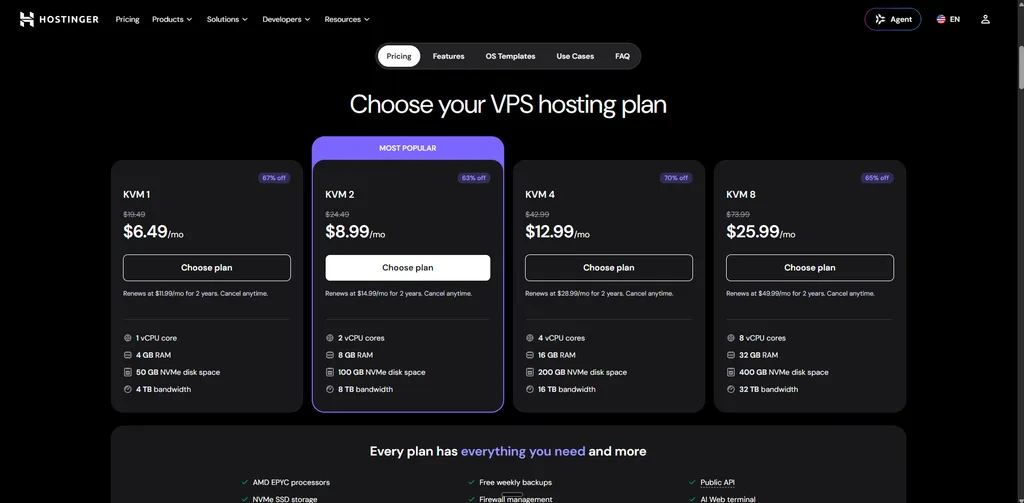
For this walkthrough, I am using Hostinger VPS hosting. For a comfortable beginner setup, I would start by looking at KVM 2 instead of automatically choosing the smallest plan. Hostinger currently lists KVM 2 with 2 vCPU cores, 8 GB of RAM, 100 GB of NVMe storage, and 8 TB of bandwidth. Plans and prices change, so I confirm the current specifications at checkout.
Disclosure: This article contains an affiliate link. If you buy through it, I may earn a commission at no extra cost to you.
You can also try coupon LEONARDO for an additional 10% discount. In the checkout flow I used, the coupon did not apply to monthly billing, and promotional rules can change. I always check the final price and renewal terms before paying.
If you already have a suitable VPS from another provider, there is no reason to buy a second one. The important part is having a fresh, compatible server and enough capacity for the applications you plan to run. My KVM 2 recommendation is a practical starting cushion, not a promise that every project needs the same resources.
Step 2: Select EasyPanel During Hostinger Setup
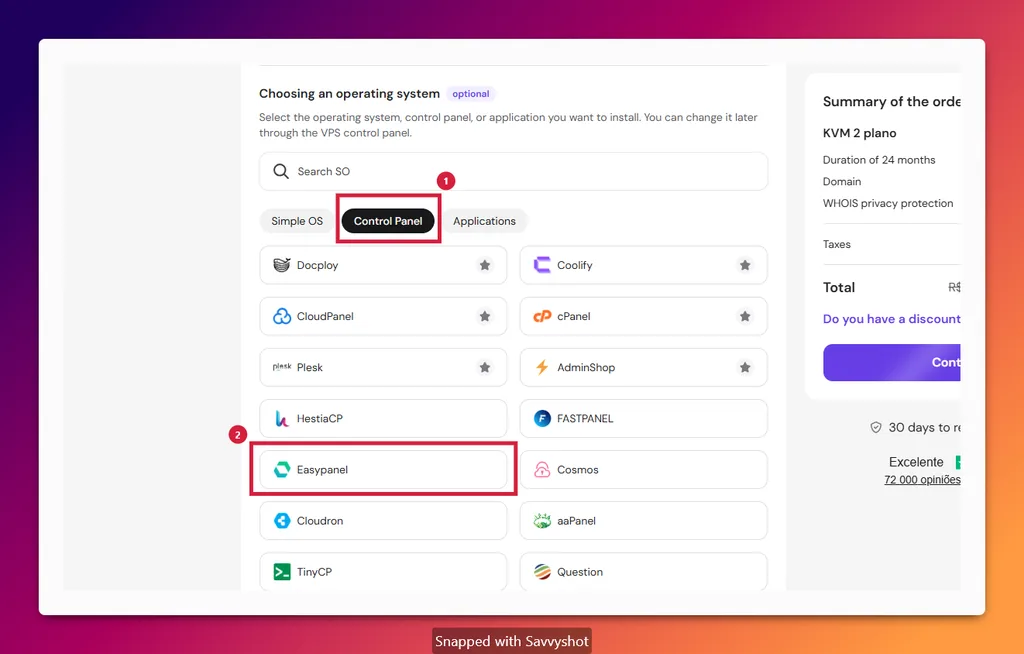
During the Hostinger VPS setup, I open the operating system section, choose the Control Panel tab, and select EasyPanel. This prepares the server with a visual application dashboard and removes most of the manual Docker work from the Typebot installation.
If the VPS is already running a plain Ubuntu installation, EasyPanel can also be installed separately. In that case, I follow the current EasyPanel installation documentation and make sure ports 80 and 443 are available. For a first attempt, I prefer the preconfigured Hostinger option because it gives me a more repeatable starting point.
Step 3: Finish Provisioning and Open EasyPanel Safely
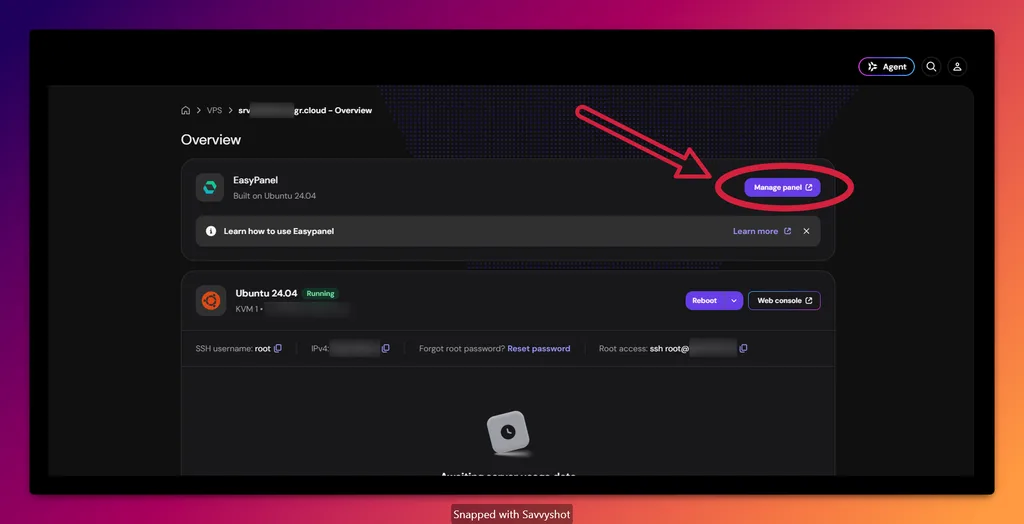
After payment, Hostinger needs a little time to provision the VPS. When the server is ready, I open hPanel, enter the VPS management area, and click Manage panel in the EasyPanel card.
The first access can happen while the automatically generated HTTPS certificate is still being issued. If the browser shows an insecure connection warning, I wait a few minutes and reload the address. I do not enter an administrator password, SMTP password, or secret key over an unencrypted page. Once the address opens securely, I complete the EasyPanel administrator form with a unique password.
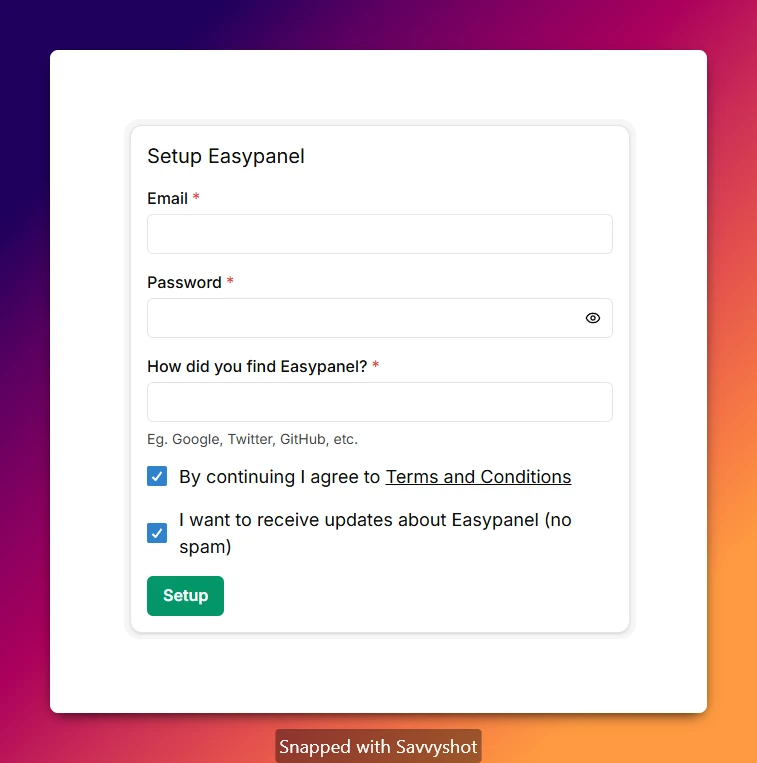
I save the EasyPanel address and recovery details in my password manager. This dashboard can deploy applications and change server services, so I protect it with the same care I would give a hosting account. I also avoid exposing database ports directly to the internet. Visitors should reach the applications through their normal HTTPS addresses, not internal container ports.
Step 4: Create the Project That Will Hold Typebot
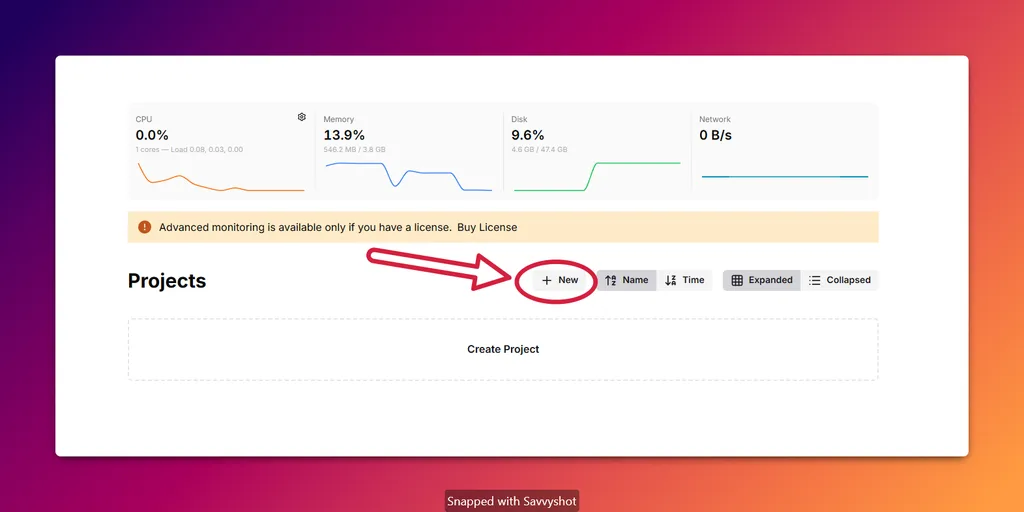
On the EasyPanel home screen, I click New in the Projects area. A project is simply the container that keeps the related services together.
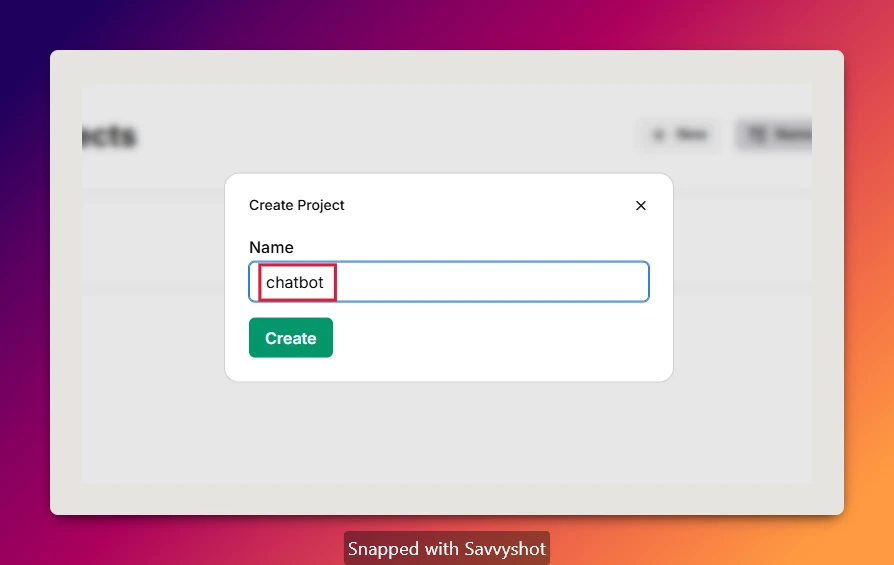
I used chatbot as the project name. A simple lowercase name is easy to recognize later, especially when the same project contains Typebot and MinIO.
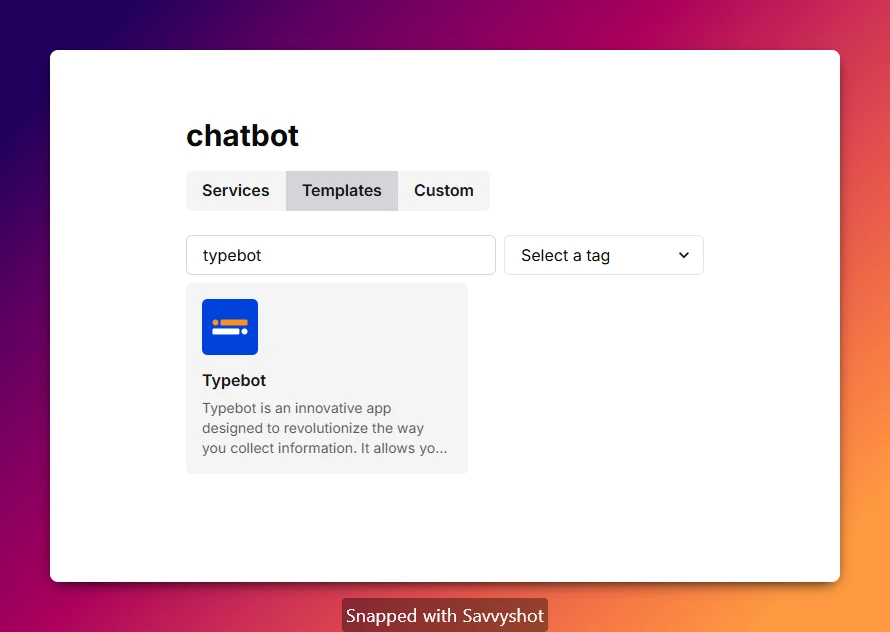
Inside the project, I open Templates, search for Typebot, and select the Typebot template. EasyPanel calls this a one-click deployment, but I still review every field before clicking Create. One click is convenient. Reading what the click will do is even better.
Step 5: Enter the Exact Administrator Email
The template asks for the application service name, builder image, viewer image, administrator email, and optional OAuth settings. I use email authentication in this walkthrough, so I leave the optional Google and GitHub fields empty.
The most important field on this screen is Admin Email. I enter the exact address I will use to create my Typebot account. Typebot’s configuration reference explains that the email stored in ADMIN_EMAIL receives the unlimited plan when that user is created. If I install with one email and sign in with another, the second account will not receive that administrator access.
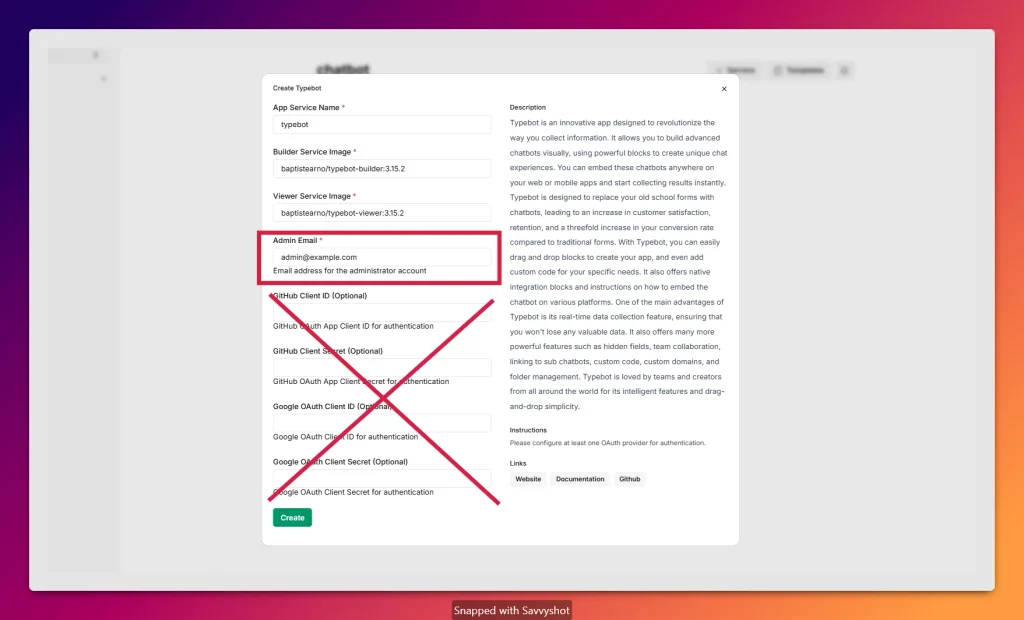
I check the spelling twice, keep the template’s current builder and viewer image defaults, and click Create. EasyPanel now creates the Typebot builder, Typebot viewer, database, and related services. I wait until the service indicators are green before changing the environment.
The generated addresses are created automatically. The builder is where I log in and design flows, while the viewer opens published bots for visitors. EasyPanel normally places those addresses in NEXTAUTH_URL and NEXT_PUBLIC_VIEWER_URL. I do not need custom DNS records for this method.
Step 6: Configure Hostinger Email Authentication
Typebot sends a magic login link through email, so the builder needs working SMTP credentials. In EasyPanel, I select typebot-builder, open Environment in the sidebar, and add the mail settings.
I am using a Hostinger Email mailbox. In the block below, I replace the placeholders with my complete mailbox address and its password. I never put the real password in an article, screenshot, shared document, or public code repository.
DISABLE_SIGNUP=false
SMTP_USERNAME=you@example.com
SMTP_PASSWORD=your-email-password
SMTP_HOST=smtp.hostinger.com
SMTP_PORT=465
NEXT_PUBLIC_SMTP_FROM=Typebot Notifications <you@example.com>
SMTP_SECURE=true
SMTP_IGNORE_TLS=false
SMTP_AUTH_DISABLED=false
Hostinger documents port 465 with SSL/TLS, and Typebot recommends SMTP_SECURE=true for port 465. If that combination fails in a particular mailbox configuration, Hostinger lists port 587 with TLS or STARTTLS as the alternative. I use the settings currently shown in hPanel instead of guessing.
I paste the variables below the values already created by the template. I do not delete DATABASE_URL, ENCRYPTION_SECRET, NEXTAUTH_URL, NEXT_PUBLIC_VIEWER_URL, or any other existing value. Then I click Save, click Deploy, and give the builder about five minutes to restart.
Step 7: Sign In Before Disabling Registration
When the builder service is green again, I use its external-link icon to open the generated builder address. A temporary error during the first restart usually means the service is not ready yet. I wait, refresh, and check the EasyPanel logs if the error continues.
On the Typebot login screen, I enter the exact same email saved as ADMIN_EMAIL and submit the form. Typebot sends a magic link or verification code to that inbox. After completing the login, I check the workspace settings and confirm that the administrator workspace has the unlimited plan.
This order matters. I leave DISABLE_SIGNUP=false until the administrator account exists. If I disable signup too early, I can block the very registration I still need to complete.
Run a quick text-only test
Before adding storage, I create a simple Typebot with a greeting, one input block, and a final message. I preview it, publish it, and open the public link. If the text flow works, I know the builder, viewer, database, login, and generated addresses are communicating correctly.
- Create a new Typebot.
- Add a greeting, one question, and a closing message.
- Preview the flow inside the builder.
- Publish it and open the public viewer link.
- Submit a response and confirm that it appears in Results.
Step 8: Add MinIO for Images, Audio, Video, and Files
At this point, Typebot can handle text, but file uploads need S3-compatible object storage. I use MinIO, an object storage server compatible with the Amazon S3 API. A simple way to think about it is a private storage service running on the same infrastructure I control.
Typebot’s official S3 guide requires a bucket, CORS rules for uploads, and public read access for files under the public path. I keep that scope narrow. Making the entire bucket publicly downloadable is unnecessary.
Generate and save the MinIO credentials
I can open the SiteGrowthKit MinIO Credentials Generator to prepare the username, password, alias, and one-line command used later. I keep the page open because I will return after EasyPanel creates the MinIO address. For a production server, I store every generated value in a password manager and replace any short password with a long, unique password before deployment.
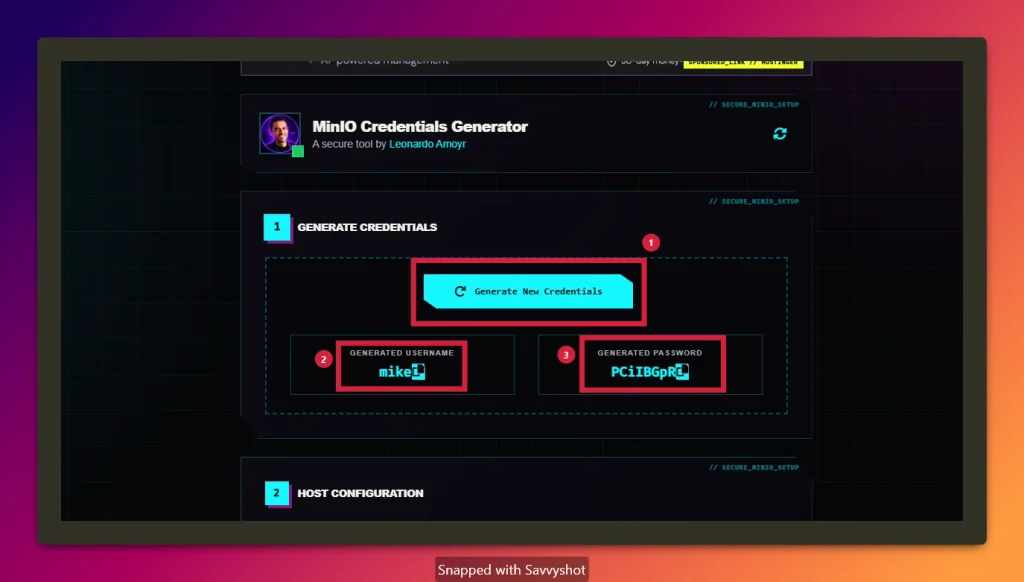
These values are sensitive. The MinIO root username and password should never appear in a tutorial screenshot. The service account access key and secret key created later are also credentials, not harmless configuration labels.
Install the MinIO template
Back in the same EasyPanel project, I open Templates, search for MinIO, and select it. I copy the saved username and password into the template fields, then click Create.
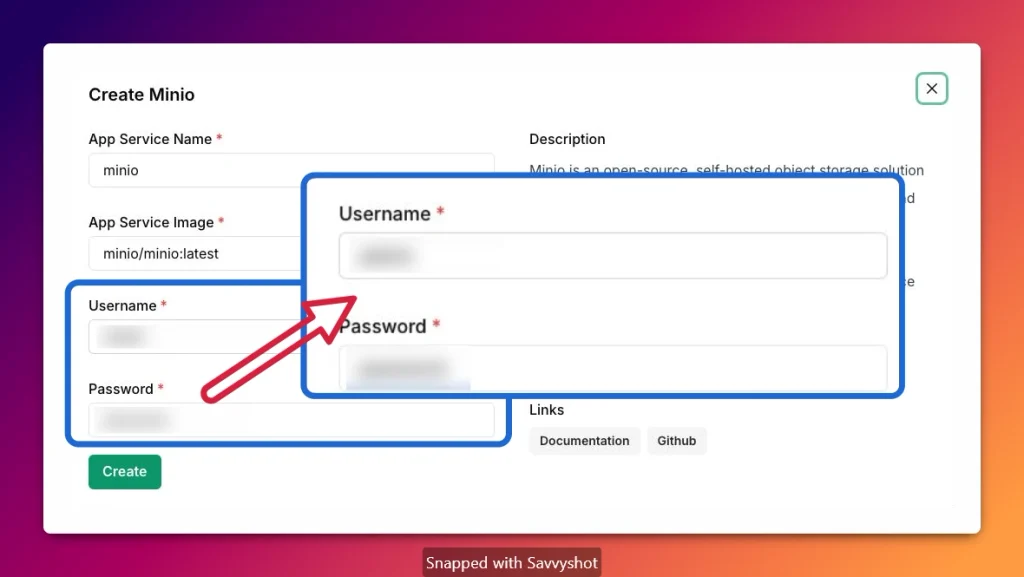
I wait for the MinIO service indicator to turn green. Then I open the MinIO console from its external-link icon and sign in with the username and password I just created.
Create the bucket with the exact name typebot
Inside MinIO, I dismiss the welcome dialog if it appears, choose Create Bucket, and name the bucket typebot. I use lowercase letters and no spaces. The Typebot environment will use the same name, so changing it in only one place will break uploads.
Get the MinIO host and create a service account
I return to EasyPanel, select the MinIO service, and open Environment. The value named MINIO_SERVER_URL is the public MinIO host. I copy the complete HTTPS URL.
Next, I return to the credentials generator. In Alias, I enter a short local name such as chatbot. In Host, I paste the complete MINIO_SERVER_URL, including https://. I generate the command and copy it, but before running anything I check its access scope.
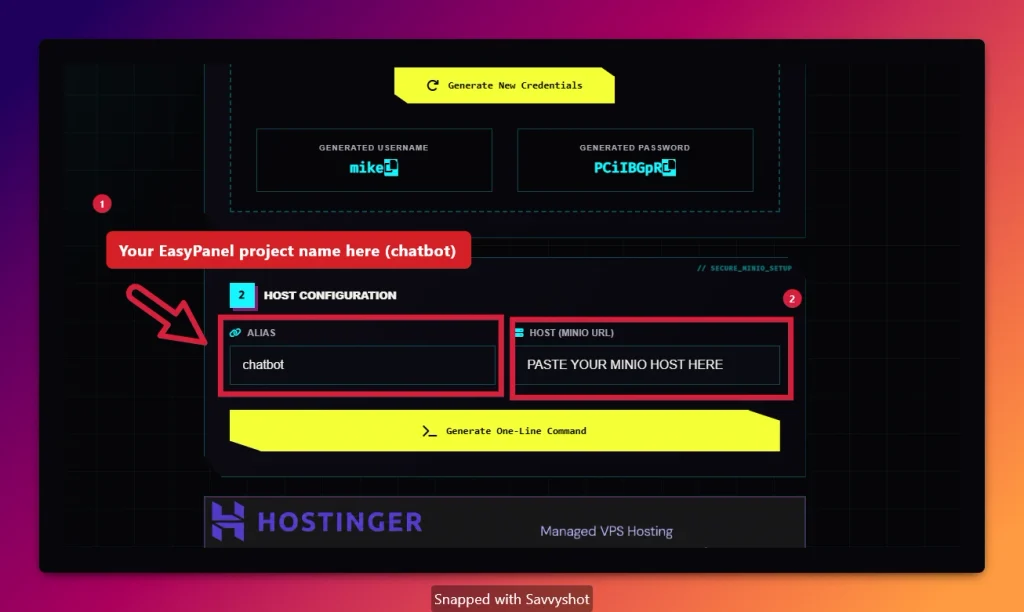
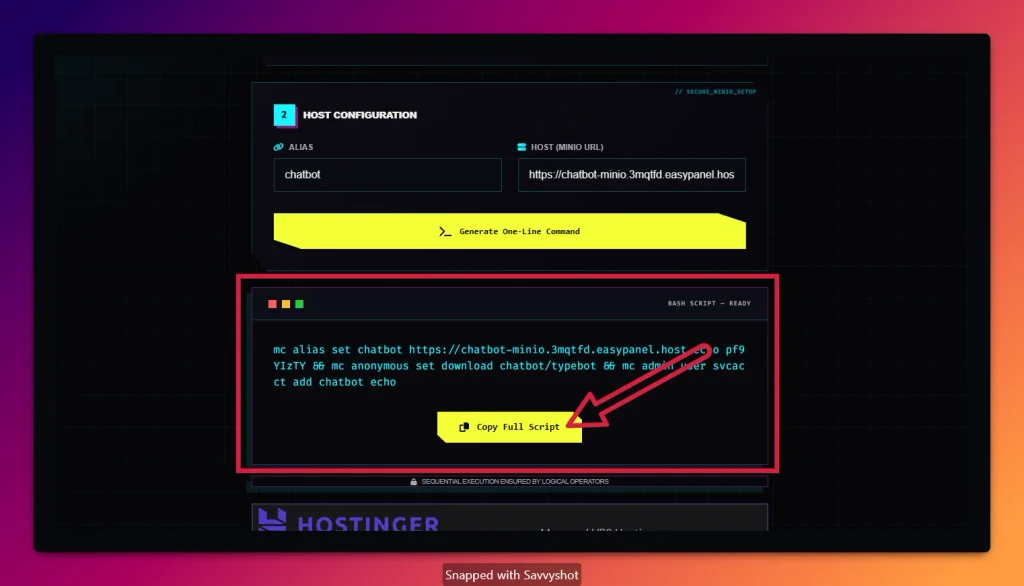
For better privacy, the anonymous download target should be the public prefix, not the whole bucket. The relevant portion should end in chatbot/typebot/public when chatbot is my alias. This follows Typebot’s documented policy, which grants public read access only to objects under public/*.
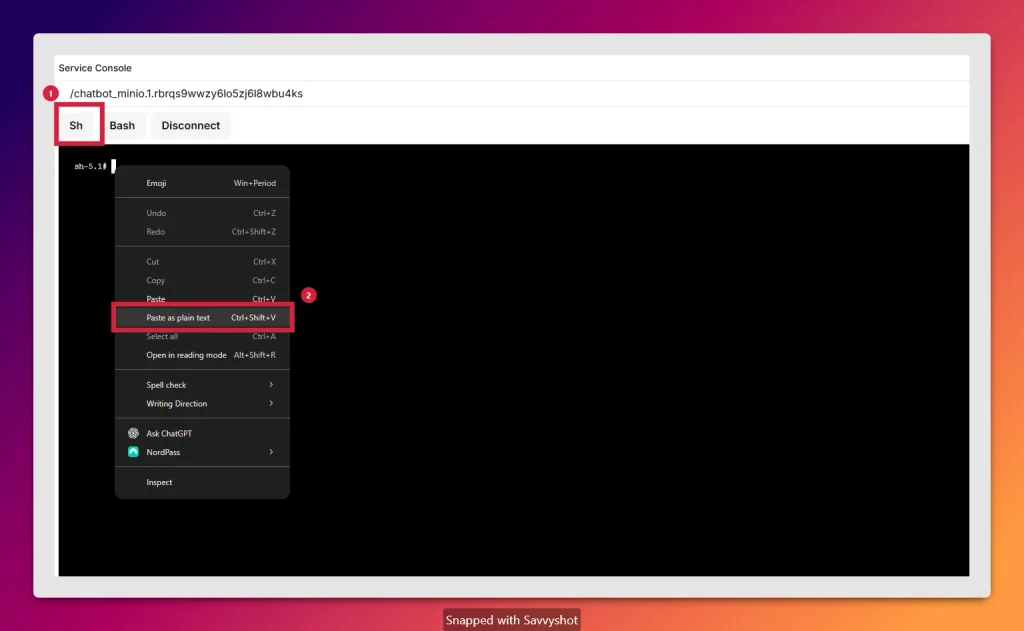
mc anonymous set download chatbot/typebot/publicIn EasyPanel, I open the MinIO service console, select Sh, paste the reviewed command as plain text, and press Enter. Pasting as plain text prevents browser formatting from adding unexpected characters.
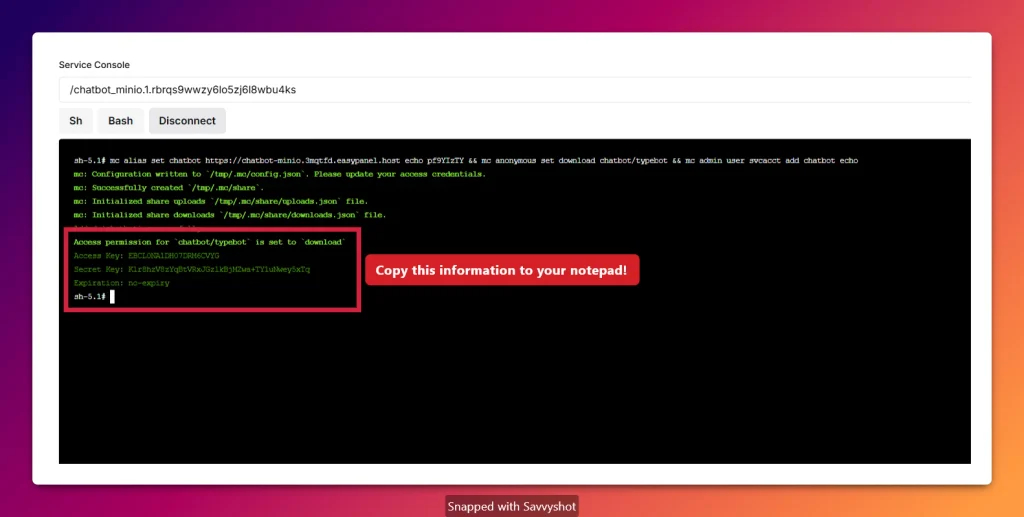
The final command creates a service account and prints an access key and secret key. I copy both directly into my password manager. I do not take a screenshot, paste them into public notes, or reuse them for another application.
Add the S3 variables to typebot-builder
I open typebot-builder, return to Environment, and add the following block below the existing variables. I replace every placeholder with the credentials and MinIO host from my installation.
S3_ACCESS_KEY=your-service-account-access-key
S3_SECRET_KEY=your-service-account-secret-key
S3_BUCKET=typebot
S3_ENDPOINT=your-minio-host.easypanel.host
S3_SSL=true
The S3_ENDPOINT value must contain only the host, without https:// and without a trailing slash. Because the generated address uses HTTPS, I keep S3_SSL=true.
Repeat the storage settings in typebot-viewer
I save and deploy the builder, then open typebot-viewer and add the same S3 block there. This distinction is easy to miss:
- The SMTP email variables belong in typebot-builder.
- The MinIO and S3 variables belong in both typebot-builder and typebot-viewer.
I click Save and Deploy in the viewer as well. Then I wait about five minutes for both services to become healthy again.
Step 9: Disable New Signups and Run the Full Test
Now that my administrator account already exists, I return to the builder environment and change DISABLE_SIGNUP=false to DISABLE_SIGNUP=true. I save and deploy one more time. According to Typebot’s configuration documentation, this blocks new public signups while still allowing invited users to register.
I do not apply this change before creating the administrator account. Locking the door is smart. Locking it while I am still outside is less impressive.
After the final restart, I open the same test bot and add an image or file upload block. Then I publish it again and test the full flow in a private browser window.
- The builder opens over HTTPS and accepts my administrator login.
- The workspace shows the unlimited administrator plan.
- The public viewer opens the published bot.
- A test answer appears in the Results area.
- An uploaded image or file is stored and displayed correctly.
- A private browser cannot create an unrelated public account.
- The bot works on both desktop and mobile.
If the direct viewer link works, I can move on to embedding the chatbot on a website. Typebot provides Standard, Popup, and Bubble publishing options, but I test the standalone link first. That sequence makes troubleshooting much easier.
The Problems I Check First
The builder address does not open
I confirm that the builder service is green, the generated address points to the correct service, and HTTPS provisioning has finished. Then I read the deployment output and runtime logs. Repeatedly deleting and recreating the template is rarely as useful as reading the first real error.
The login email never arrives
I verify the full SMTP username, mailbox password, host, port, sender address, and security flags. I check the spam folder and builder logs. For Hostinger Email, the documented primary combination is smtp.hostinger.com, port 465, and SSL/TLS. The documented alternative is port 587 with TLS or STARTTLS.
The workspace shows the Free plan
I compare the account email character by character with ADMIN_EMAIL. Typebot’s troubleshooting guide identifies a missing administrator variable or a different signup email as the usual cause. I correct the configuration before considering any manual database edit.
Text works, but uploads fail
I check that the bucket is named typebot, the access key and secret key belong to the service account, and the endpoint does not include https://. I also confirm that the same S3 block exists in both builder and viewer. If browser uploads still fail, I review the bucket’s CORS policy against Typebot’s current S3 documentation.
Sessions disappear after a configuration change
I make sure the builder address still matches NEXTAUTH_URL and that the builder and viewer use the same ENCRYPTION_SECRET. I do not casually regenerate that secret because changing it can invalidate sessions and encrypted credentials.
Backups and Updates Are Part of the Installation
A working login screen is not the finish line. The Typebot team makes the tradeoff clear: with self-hosting, I am responsible for maintenance, upgrades, capacity, uptime, backups, security, and performance. EasyPanel makes those jobs more approachable, but it does not make them disappear.
Back up persistent data
I back up the PostgreSQL data and MinIO storage, not just the application containers. I keep at least one backup outside the VPS. A backup stored only on the machine it protects can vanish with the same disk failure.
Update with a rollback plan
Before changing Typebot or MinIO image versions, I read release notes, create a fresh backup, and record the last working version. I also update during a quiet period. A live campaign is a terrible time to discover that a migration needs more attention.
Watch the resources that actually matter
I monitor CPU, memory, disk usage, service health, and logs in EasyPanel. If bots become slow, I measure before upgrading. More RAM can solve one bottleneck, while a slow external API or a full disk needs a completely different fix.
Now the Setup Is Ready for a Real Bot
That is the complete path I use to install Typebot on a VPS: choose suitable server resources, select EasyPanel, deploy the Typebot template, enter the exact administrator email, configure SMTP, create the account, add MinIO storage to both Typebot services, disable public signup, and test the result from end to end.
The result is a Typebot installation running on infrastructure I control, with the free EasyPanel service addresses and no required custom subdomains. It can be more economical than a managed platform for the right project, but the comparison is not only about the monthly invoice. The managed option includes work that I now perform myself.
If you still need a server, you can review the current Hostinger VPS plans and try coupon LEONARDO for 10% off. Check the final checkout conditions before buying.
Test the process carefully, keep the credentials private, and tell me in the comments how your installation went. I would love to know which part was easiest and where you needed an extra cup of coffee.